
Debugging is an essential skill to master when working with Kubernetes, as it gives you the power to build high-quality applications.
Bugs are typically a result of an error, oversight, or mistake made during the development process, and they often cause problems ranging from stability issues to operability problems. In Kubernetes, these bugs could be introduced due to crashes, misconfigurations, and network partitioning, amongst other things.
In this article, I’ll explain the meaning of Kubernetes services, how it works, common issues you’ll encounter while running a Kubernetes service and how to fix them. Finally, I’ll show you how to effectively debug Kubernetes services using Telepresence.
Prerequisites
This article assumes that the reader has the following:
- Kubectl installed and set up on their local machine
- Docker Desktop installed and set up on their local machine
- Kubernetes on Docker Desktop enabled
Note: Kubernetes on Docker Desktop is not a strict requirement. You can achieve the same result using a Kubernetes distribution of your choice.
A quick refresher on Kubernetes and its basic concepts
Containers are an essential piece of technology in our present day. They allow us to write, test, bundle, run and deploy applications in multiple environments. Containers make it convenient for engineering teams to test assumptions without thinking of portability and size.
Kubernetes is an open-source container orchestrator that helps you manage containers and automate processes. In straightforward terms, Kubernetes takes ownership and full responsibility for your containers and manages everything, from container network to storage, computing power, security, and configuration of your containers, amongst other things.
A typical Kubernetes cluster contains a node with running pods. Pods are the smallest fundamental unit in Kubernetes, representing a single instance of a running process in a Kubernetes cluster. Every Pod is bound to the node on which it is scheduled, and it stays there until it is terminated (following the restart policy) or deleted. Pods connect via a service.
What is a Kubernetes Service?
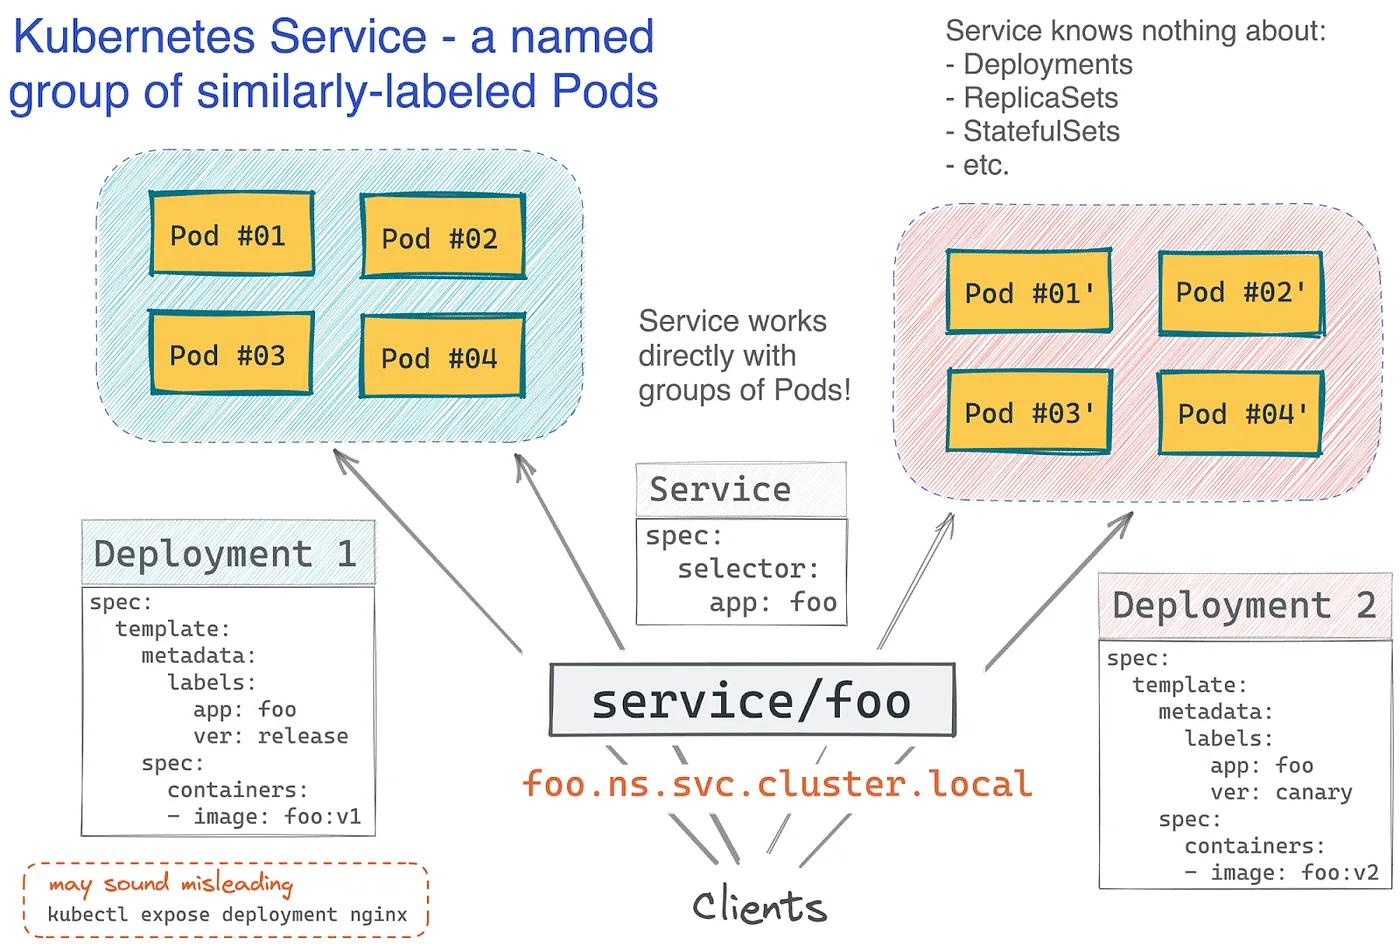
A Kubernetes service is a conceptual way of exposing an application running on different pods as a network service. It allows you to keep track of critical pods without losing access or links to them.
Imagine your application’s front end is hosted on a container deployed in a particular pod, and your back end is deployed in a different pod within the same Kubernetes cluster. How do we connect these two important pieces? Kubernetes Services to the rescue! Services link an application's front and back end, both executed in different deployments inside a cluster.
Labels and selectors are used by Kubernetes services to match pods with other applications.
How to fix common issues encountered when running Kubernetes services
As with anything in code, you’re bound to make mistakes when managing your containers using Kubernetes. Some mistakes can be quite costly, while some are negligible. All in all, it’s always safe to do everything possible to mitigate occasions of failure, especially when deploying applications on Kubernetes.
Errors can occur at each step of the deployment process: from defining your Pods to defining your Service to configuring your infra to run these different operations. As mentioned earlier, this article focuses on Kubernetes services and how to debug them effectively.
Let’s explore some real-world, practical scenarios for debugging a Kubernetes Service.
Scenario 1: The service doesn’t exist
In this scenario, we have a sample web application called the Donut app. The goal is to containerize and deploy this application using Kubernetes. To build a container image, you need a source file and a Dockerfile. A Dockerfile contains instructions on how the image should be built.
1. Clone the Donut app repository to access the source file and dockerfile:
git clone https://github.com/thisisobate/donut-app.gitcd donut-app
2. Build the image
docker build -t donut-app-container .
3. Run the container
docker run -dp 3009:3009 donut-app-container
4. Upload the image to Docker Hub
// Replace thisisobate with your actual docker/dockerhub username
docker tag donut-app-container thisisobate/donut-app-container

docker push thisisobate/donut-app-container
On containerizing this application, let’s make sure the Kubernetes cluster is set up. To do this, navigate to the settings page on Docker desktop and select the Kubernetes tab to activate your cluster. Also, set your kubeconfig and context to docker desktop by running this command:
export KUBECONFIG=~/.kube/config.
Next, let’s create a deployment in the Kubernetes cluster. To do this, create a file named donut_app_deploy.yaml and paste the YAML configuration file below.
Then go back to your terminal and run this command: kubectl apply -f donut_app_deploy.yaml to create the deployment. On doing this, you’ll get a response saying, deployment.apps/donut-app-local created. Next, run this command kubectl get pods -l app=donut-app-local to confirm that the deployment we created is running as expected. On doing this, you’ll get results similar to the one below:
NAME READY STATUS RESTARTS AGE
donut-app-local-db9c7d79b-bhgxx 2/2 Running 0 15s
donut-app-local-db9c7d79b-nxnst 2/2 Running 0 44s
You can also confirm that your Pods are serving. This is an extra step to check if individual pods are running and serving as expected. You can get the list of Pod IP addresses and test them directly.
kubectl get pods -l app=donut-app-local \ -o go-template=’{{range .items}}{{.status.podIP}}{{“\n”}}{{end}}’You’ll see something like this:
10.1.0.22
10.1.0.21
Now, let’s try to access the Service for the donut-app Pod by running
kubectl get svc donut-app-local-service. This will return an error similar to this:
Error from server (NotFound): services “donut-app-local-service” not found
So, how do we debug this error? The first thing is to read and understand the error message. From the response, you’ll notice that there are no donut-app-local-service. So, let’s create it! To do this, create a file named donut_app_service.yaml and paste the YAML configuration file below.
Then go back to your terminal and run kubectl apply -f donut_app_service.yaml to create the service. Doing this will return this response service/donut-app-local-service exposed,confirming that the Kubernetes service has been created successfully.
If we run this commandkubectl get svc donut-app-local-service again, you’ll get a response below confirming that the donut-app-local-service service now exists.
Save your changes and view the donut application hosted on Kubernetes by hitting the cluster’s IP address. In my case, that’s
10.97.58.82.
Scenario 2: Wrong service naming
Let’s create another deployment named ANOTHER_DONUT_APP using the imperative approach:
kubectl create deployment ANOTHER_DONUT_APP image=registry.k8s.io/serve_hostname
You’ll get an error that says:
By design, the name of a Service object must have a valid . This means that Kubernetes will not accept service/deployment names that do not conform to the RFC 1035 standard. So, always keep an eye on your label name when creating a Kubernetes service.
Scenario 3: Bugs in a running service
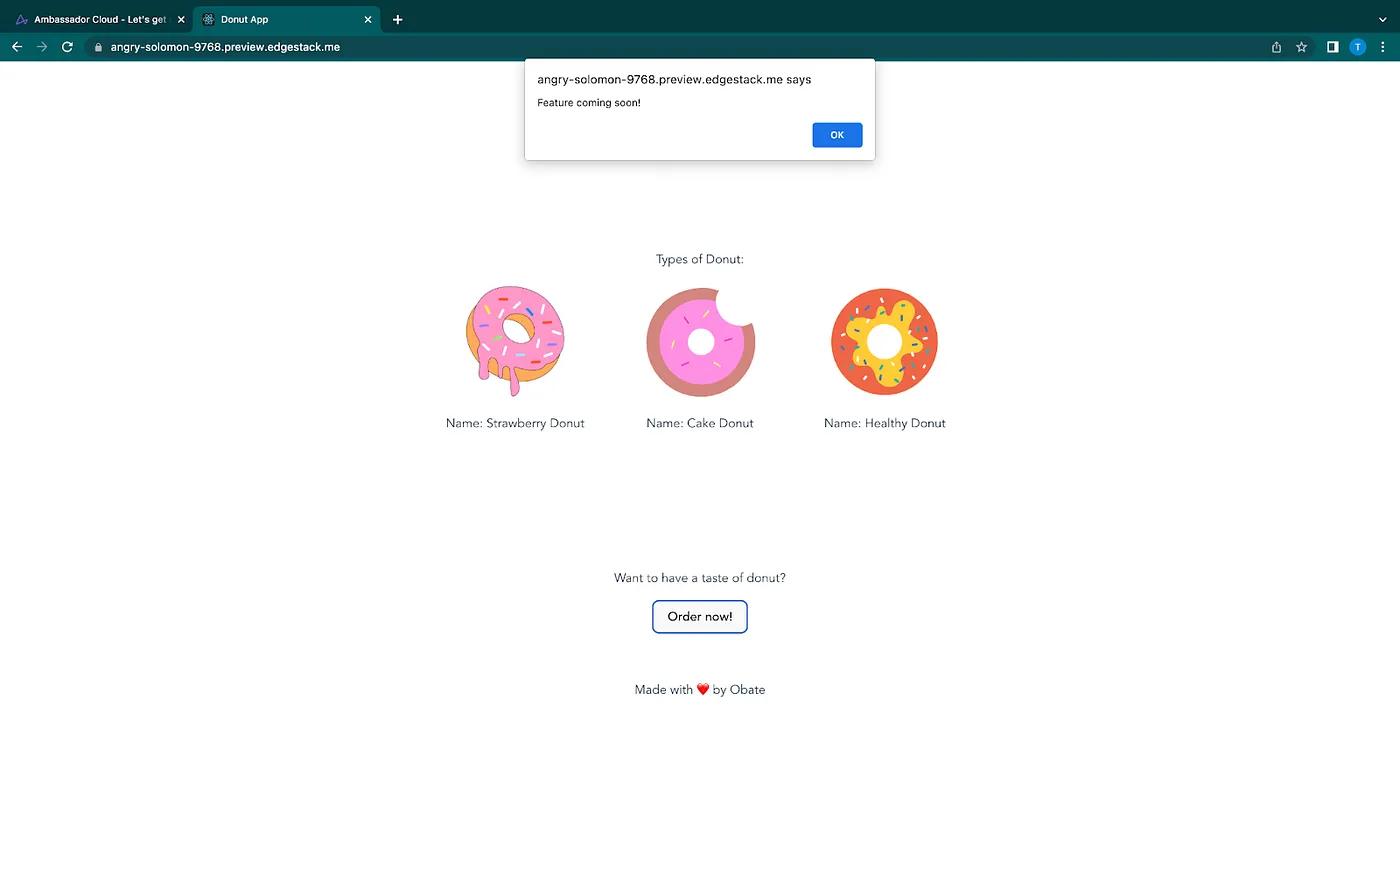
If you navigated through the Donut app you cloned in “Scenario 1” of this article, you may have noticed that clicking on the “Order now!” button doesn’t work.

This is because the “Order now!” feature is still a work in progress but was mistakenly deployed to production. To clarify this to the users of the Donut app, let’s add an alert that will notify the users that this feature is still a work in progress. Follow the steps below to update the local service running on your local development environment:
- Open the Donut app on your code editor, and navigate to the
src/app.jsdirectory.
- Locate the button tag and replace it with this:
<button onClick={() => alert(‘Feature coming soon!’)}>Order now!</button>
- Save your changes
After adding the alert on the local service, I want to ensure that this code change will interact well with other remote services of the Donut app running in production. Following the most common route of running everything remotely would require me to build a new docker image of the updated application, push it to DockerHub and deploy it to the remote Kubernetes cluster before seeing the impact of the code changes I made.
If the update didn’t go as expected, I’d have to go through this process over and over again till I’m satisfied with the updated code changes. This build-push-test cycle significantly slows down development and iteration time. So, I’ll use a CNCF tool called Telepresence to speed up my development time and feedback loop. How? Keep reading to find out.
Debugging Kubernetes services with Telepresence
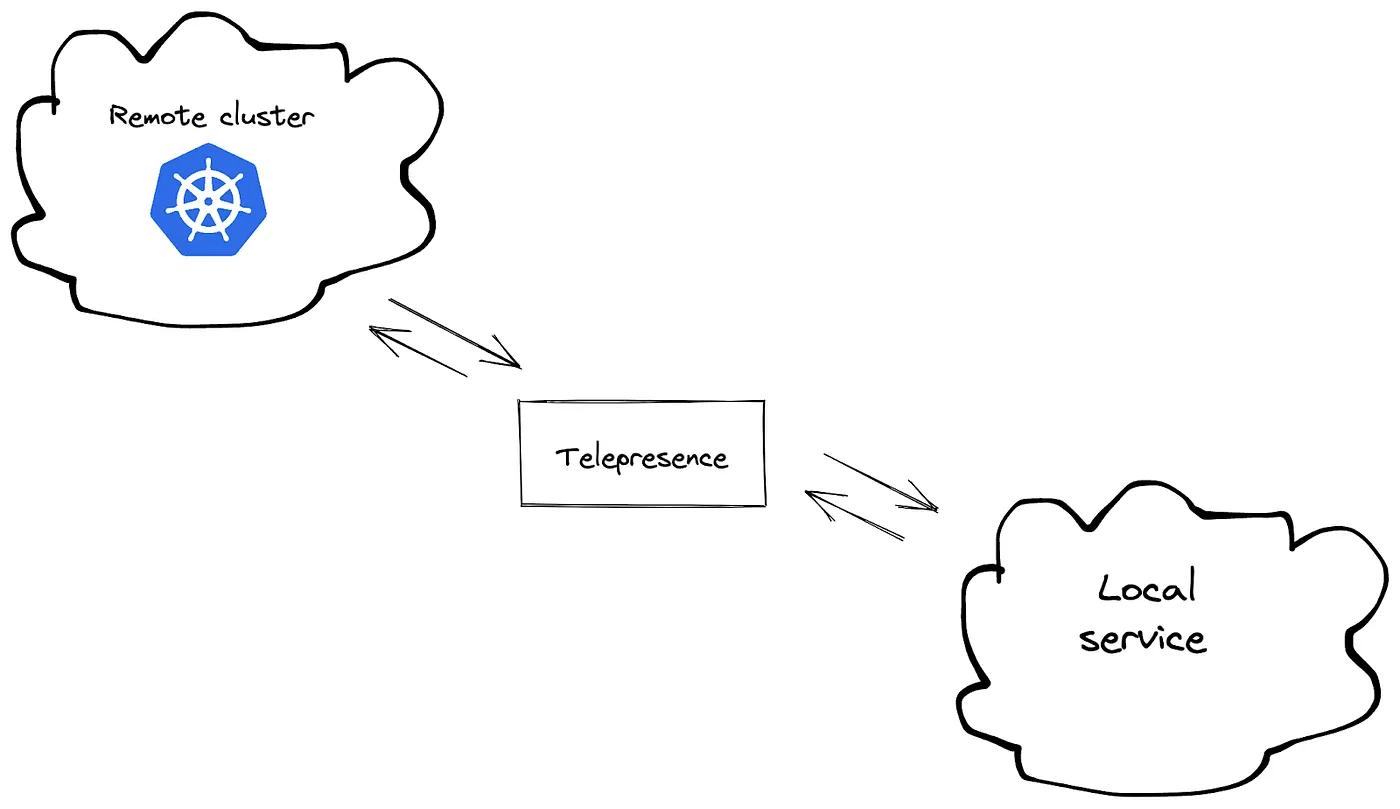
Telepresence is an open-source tool that enables you to set up a remote development environment for Kubernetes where you can still use all of your favorite local tools like IDEs and debuggers and test your local services against the microservices in a remote Kubernetes cluster. Telepresence does this by capturing the requests going into the remote Kubernetes cluster and routing the traffic to the local service on your local development environment.
With Telepresence, you can make changes on the fly and see them reflected immediately, just like hot reloading, but this time the local service is interacting with the dependencies of the remote Kubernetes cluster.
Since this scenario is centered around debugging a running Kubernetes service, the assumption is that you have a remote Kubernetes cluster where this service is running in and a local service running independently on its own port in your local dev environment.
For this tutorial, I deployed the donut application remotely on a GKE cluster. I’ve also set my local kubeconfig and context to the GKE cluster. Now let’s start our local service:
- Open up a new terminal window on your local machine
- Navigate to the donut code directory and run
npm installto install all dependencies - Run
npm startto start the donut application and make it accessible at port 3009.
Note: Make sure you don’t kill this process to successfully establish an intercept with the remote cluster.
The next thing you’ll be expected to do is install Telepresence. To do this, head to their Telepresence official documentation and follow the installation process compatible with your local machine. After installing Telepresence successfully on your local machine, run the telepresence connect command. This command will establish a connection between your local machine and the remote Kubernetes cluster.
Launching Telepresence Root DaemonConnected to context gke_remote-donut-app_us-central1-c_my-first-cluster-1 (https://35.232.134.92)
Now that your local machine and the remote Kubernetes cluster have been connected successfully, run the telepresence list command to see the list of services you can intercept and also confirm that the service you indeed want to test is among them.
donut-app-gke: ready to intercept (traffic-agent not yet installed)
Then, run the command below to create an intercept that will reroute the traffic intended for the donut service in the remote Kubernetes service to the donut service running on your local machine.
telepresence intercept donut-app-gke — port 3009:82
This will prompt you to authenticate your ambassador cloud account. On doing that, the intercept will be created, and results similar to the one below will be shown:
Copy the preview URL and paste it on your browser. When the page loads, you’ll see that the updated donut service integrates and interacts successfully with the other dependencies in the remote Kubernetes cluster.
And if the updated code changes didn’t work as expected, all I’d need to do is make the code change on my local machine and then click on the reload icon on my browser, and just like that, I’ll be able to see the updated changes. Telepresence ensures you can test and debug Kubernetes services without going through the slow build-push-test cycle.
Summary
This article highlighted various ways bugs can occur when working with Kubernetes services and how to debug a Kubernetes service effectively.
Developing & testing the impact of your microservices’ code changes in a containerized environment like Kubernetes isn’t as fast as it would be with a monolith and traditional computing environment. You typically have to wait for the container to build, be pushed to a registry, and deployed before seeing the impact of your code changes. This takes time and makes your inner development loop slow.