Building a robust and efficient RESTful API requires careful planning and implementation. One of the key components of any successful API implementation is an API Gateway, as it acts as a front door to your API and helps manage the flow of requests and responses. Edge Stack is a popular and powerful API Gateway. It provides many features for managing, securing, and optimizing API traffic.
In this context, designing a RESTful API using Edge Stack requires a clear understanding of RESTful principles, a solid knowledge of the HTTP protocol, and an ability to apply these concepts to create a scalable and easy-to-use API. This guide will teach you how to deploy a REST API using the Edge Stack API gateway.
What is an API?
API stands for Application Programming Interface. It is a set of protocols, routines, and tools for building software and applications. It defines how different software systems interact with each other and exchange data.
APIs allow different systems to communicate with each other in a consistent and standardized way. This makes it easier for developers to build new applications and integrations. For example, a social media platform might expose an API that allows developers to access user data and post updates to their feeds.
You can implement APIs using various technologies and standards, such as REST, SOAP (Simple Object Access Protocol), or GraphQL. Additionally, APIs are often used with web services and microservices, which provide a way to expose backend functionality over the internet.
What is a REST API?
REST stands for Representational State Transfer. It is a popular architectural style for building web services and APIs. REST defines a set of constraints and best practices for creating scalable, maintainable, and interoperable web services.
RESTful web services use HTTP as the underlying protocol for communication. This makes using RESTful APIs in various programming languages and platforms easy. RESTful APIs use standard HTTP methods, such as GET, POST, PUT, DELETE, and PATCH, to perform operations on resources. Such as retrieving data or updating a database
In RESTful design, standard HTTP methods represent resources as URLs and manipulate them. For example, a RESTful API for a to-do list application might have an endpoint “
/tasks” that represents the tasks in the list, and operations like creating a new task (POST to “/tasks”), retrieving all tasks (GET to “/tasks”), or updating a specific task (PUT to “/tasks/{task_id}”).
What is Edge Stack?
Edge Stack is an API gateway for Kubernetes that helps manage microservices and API traffic. It provides a simple, flexible way to route, secure, and manage API access. It is an open-source Kubernetes-native microservices API gateway built on the Envoy Proxy. Additionally, it provides advanced L7 traffic management capabilities, including traffic routing, service discovery, and rate limiting.
Prerequisites
For this tutorial, you will need:
- A Kubernetes cluster to install Edge Stack.
- Familiarity with Kubernetes concepts, YAML, and the Envoy Proxy.
- The REST API you want to expose.
- Command Prompt (CMD) or a power shell editor
- Visual Studio Code VSCode
- Postman
Set up a Kubernetes cluster using Amazon EKS
Using Amazon EKS as the underlying infrastructure for Edge Stack API Gateway provides a robust, scalable, and highly available platform for designing and deploying a REST API.
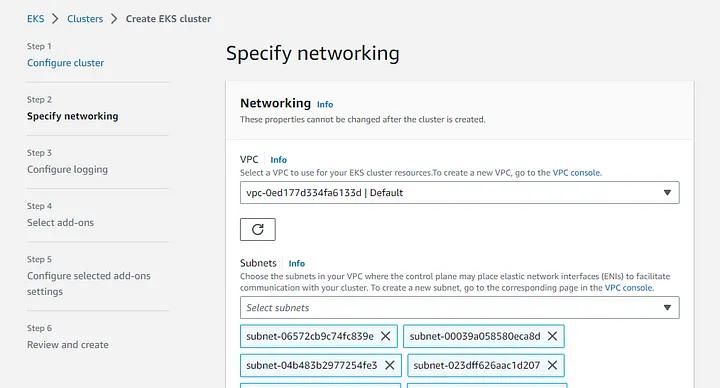
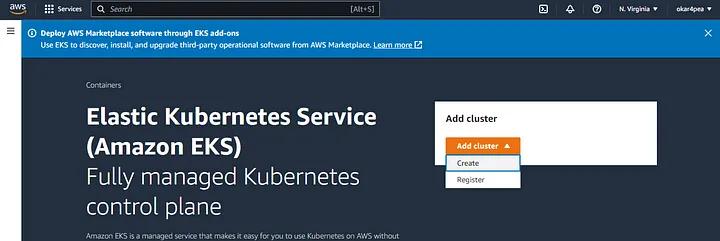
Here are the steps to run Kubernetes in Amazon Elastic Kubernetes Service (EKS) and create a cluster:
Step 1: Create an Amazon Web Services (AWS) account if you don’t already have one.
Step 2: Create an IAM role that allows Amazon EKS to manage your cluster resources.

Step 3: Create a Virtual Private Cloud (VPC) and subnets in AWS to host your EKS cluster.

Step 4: Setup an EKS Cluster master node to manage Kubernetes service on AWS

Step 5: Install and Configure AWS CLI on your laptop. After doing this, check that it has been installed properly by running the
aws — version
command:

Install and configure AWS CLI on your laptop
Download the kubectl binary for your cluster’s Kubernetes version from Amazon S3 based on your operating system. In my case, I ran the command below on my terminal.
curl.exe -O

Check if the cluster is active by running this command:
aws eks — region us-east-1 describe-cluster — name zaycodes — query cluster.status

Configure kubectl to EKS API server credentials like I did by running this command:
aws eks — region us-east-1 update-kubeconfig — name zaycodes

Validate kubectl configuration to master node by running this command:
kubectl get svc
.

Note: While the steps listed above provide a general overview of how to run Kubernetes in Amazon EKS, the exact process will depend on your specific use case and requirements. To get started, it is recommended to follow the official Amazon EKS documentation, which provides detailed instructions and best practices for launching and managing an EKS cluster.
Designing REST APIs using Edge Stack API Gateway
I’ve divided this section into several steps. So let’s get right into it.
Step 1: Define API Endpoints
Follow these steps to define the endpoints for your REST API. These should be based on the resources you want to expose and user actions. Each endpoint should use a unique URL and HTTP method (such as GET, POST, PUT, DELETE, etc.).
Here we create an endpoint for retrieving a list of users using “Python” programming language:
@app.route('/users', methods=['GET'])def get_users():# Return a list of usersreturn jsonify(users)
Step 2: Choose your API gateway
The API gateway is the central point of control for your API, and it handles tasks such as routing, load balancing, authentication, and rate limiting. For this guide, we’ll use the Edge Stack API gateway.
Step 3: Install the Edge Stack
Install the Edge Stack on your Kubernetes cluster using YAML, the configuration language for Kubernetes.
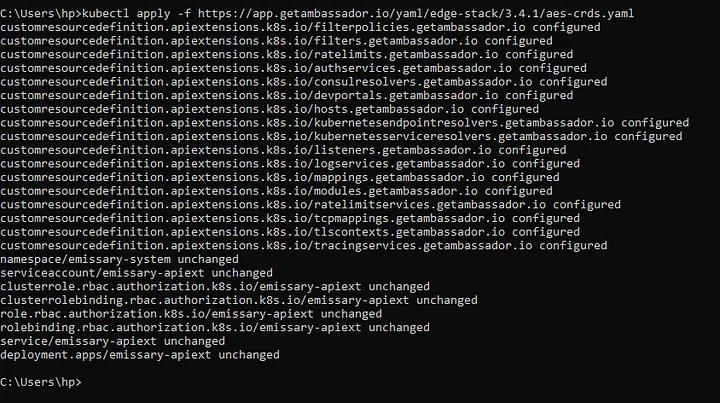
Edge Stack is installed via the command line to the Kubernetes cluster.
- Run the following command in your terminal
kubectl create namespace ambassador || truekubectl apply -f https://app.getambassador.io/yaml/edge-stack/3.5.1/aes-crds.yaml && \kubectl apply -f https://app.getambassador.io/yaml/edge-stack/3.5.1/aes.yaml && \kubectl -n ambassador wait - for condition=available - timeout=90s deploy edge-stack

- Run the following command to determine your cluster’s IP address or hostnam
kubectl get -n ambassador service edge-stack -o “go-template={{range .status.loadBalancer.ingress}}{{or .ip .hostname}}{{end}}”
Note: Your load balancer may take several minutes to provision your IP address. Repeat the command until you obtain an IP address.
Hurray! Edge Stack should now be deployed and running! However, to start deploying Services and test routing to them, you need to configure a few more resources like listener, mapping, and host in Edge Stack.
Listener: The Listener Resource must configure which ports the Edge Stack pods listen on so they can begin responding to requests
First, create a new YAML file on your local machine with the listener configuration. You can name the file
http-listener.yaml.
apiVersion: getambassador.io/v2kind: Listenermetadata: name: http-listenerspec: address: ":80" protocol: http bind: address: 0.0.0.0 port: 80 trafficPolicy: loadBalancer: policy: round_robin timeout: idle: 5m filters: - name: tcp - name: http config: serverHeader: "Ambassador"
Open a terminal or command prompt and navigate to the directory where you saved the YAML file. Then apply the configuration using the following command:
kubectl apply -f http-listener.yaml. Doing this will create a new listener object in your Kubernetes cluster!
Mapping: The Mapping Resouce configures routing requests to services in your cluster. Next, create a new YAML file with the mapping configuration. You can name the file http-mapping.yaml.
apiVersion: getambassador.io/v2kind: Mappingmetadata: name: http-mappingspec: prefix: /api service: my-service host: example.com timeout_ms: 1000 add_request_headers: x-request-id: "{{ default (guid ()) }}" add_response_headers: x-envoy-upstream-service-time: "%RESPONSE_DURATION%" rewrite: uri: /v1{{uri}}
Now, apply the configuration using this kubectl apply -f http-mapping.yaml command. This will create a new mapping object in your Kubernetes cluster!
Host: The Host Resource configures TLS termination to enable HTTPS communication. To create a host, copy the YAML configuration below and paste it into a newly created example-host.yaml file.
apiVersion: getambassador.io/v2kind: Hostmetadata: name: example-hostspec: hostname: example.com acmeProvider: email: me@example.com solvers: - selector: dnsZones: - example.com http01: ingress: class: ambassador
Then, apply the configuration using the kubectl apply -f example-host.yamlm command. This will create a new host object in your Kubernetes cluster.
Note: You may need to modify these configurations based on your requirements and environment. You can also view and manage the objects using the kubectl command-line tool.
Step 4: Define your API gateway configuration
Once you have installed the Edge Stack, the next step is to define your API gateway configuration. This includes defining your API endpoints and any necessary routing, load balancing, authentication, and rate-limiting rules. Define your API gateway configuration using YAML files, which specify the system’s desired state.
We define a route for the /users endpoint using YAML
apiVersion: getambassador.io/v2kind: Mappingmetadata: name: users-apispec: prefix: /users service: users-service timeout_ms: 30000
This configuration file maps the /users endpoint to a Kubernetes service called users-service. It also sets a timeout of 30 seconds for requests to this endpoint.
Step 5: Deploy your API
With your API gateway configuration defined, the next thing to do is to deploy your API to your Kubernetes cluster. This creates the necessary Kubernetes resources (such as pods, services, and deployments) to run your API and make it accessible through the API gateway.
Here is the Kubernetes deployment manifest for the users-service using YAML:
apiVersion: apps/v1kind: Deploymentmetadata: name: users-deploymentspec: selector: matchLabels: app: users replicas: 3 template: metadata: labels: app: users spec: containers: - name: users image: my-users-image:latest ports: - containerPort: 5000
This deployment manifest creates a deployment with 3 replicas of a container that runs your application.
Step 6: Test your API
Once your API is deployed, test it to ensure it works correctly. Use Postman to send requests to your API endpoints and verify that you receive the expected responses.
We test the /user endpoint using postman:
- Download and install Postman from the official website.
- Open Postman and create a new request by clicking the New button in the top left corner.
- Enter the URL of the API endpoint (
http://<ambassador-load-balancer>/users
- ) you want to send a request to in the address bar.
- Choose the HTTP method for the request (e.g., GET, POST, PUT, DELETE) from the dropdown menu.
- Click the Send button to send the request to the API endpoint.
This sends a GET request to the /users endpoint through the Edge Stack load balancer.
Verify that you received the expected response by checking the response body and status code. You can view the response body in the Body tab of the response editor and the status code in the top right corner.
[ { "id": 1, "name": "John Doe", "email": "johndoe@example.com" }, { "id": 2, "name": "Jane Smith", "email": "janesmith@example.com" }, { "id": 3, "name": "Bob Johnson", "email": "bobjohnson@example.com" }]
Note: If there are any issues with your API configuration or deployment or errors in your application code, you may receive error responses instead of the expected data. In that case, you can check the logs for your API and Kubernetes resources to diagnose and fix the issue.
Step 7: Monitor and manage your API
With your API deployed and tested, monitor and manage it using the tools provided by the Edge Stack. This includes monitoring API performance, tracking usage and analytics, and managing access control and security.
Conclusion
Edge Stack is an API gateway and ingress controller that enables you to manage and protect your API routes and services easily and flexibly. It also lets you manage traffic, access, and performance.

