API creation is essential for building scalable and efficient applications. Coupled with API mocking, developers can accelerate API development cycles and test applications without waiting for backend services. In this guide, I will provide you with a comprehensive overview of creating APIs from scratch and setting up API mocking to simulate API endpoints early in the development process.
What is API Creation?
API creation is the process of designing, building, and deploying APIs that allow software applications to communicate and share data seamlessly. This process involves defining endpoints, setting request and response formats, and implementing security measures to ensure reliable data exchange. Effective API creation enables developers to build scalable, flexible applications by providing standardized methods for applications to interact, whether within a single system or across multiple platforms.
API Creation and Its Key Benefits
API creation involves designing, building, and deploying APIs that allow applications to interact seamlessly. A key step in the API creation process is often API mocking, which simulates the behavior of a real API by creating a mock server that returns predefined responses. This approach enables developers to work on different parts of an application concurrently, reducing dependencies and accelerating development. With API mocking, teams can test application functionality, handle error scenarios, and validate API responses early in the development process—without needing a fully functional backend.
Designing and Building Your API
Effective API design is crucial for creating intuitive and maintainable interfaces. Begin by defining the purpose of your API and identifying the resources it will expose. Adhering to REST principles ensures that your API is stateless, scalable, and easy to understand. Use Open API Specifications to document your API endpoints, methods, and expected responses, facilitating clear communication among developers and stakeholders.
Once the design is finalized, proceed to build the API using a suitable framework. For instance, Node.js with Express is a popular choice for creating RESTful APIs. Set up your development environment, define routes corresponding to your API endpoints, and implement the necessary logic to handle HTTP requests and responses. Ensure that your API handles various HTTP methods appropriately and includes robust error-handling mechanisms.
How to Create an API with Node.js and Express
Effective API development starts with a thoughtful approach that ensures scalability and maintainability. By following the steps below, you can create an API that handles incident response playbooks for various hospital departments. I will demo a basic example for an incident response api in the next section.
1. Set Up Your Development Environment
- Ensure Node.js and npm are installed on your system.
- Create a new project directory and initialize a Node.js project
mkdir hospital-incident-response-api
cd hospital-incident-response-api
npm init -y
npm install express body-parser nodemon
2. Create the Server File
Create file server.js which acts as the main entry point to your API:
const express = require('express');
const bodyParser = require('body-parser');
const playbookRoutes = require('./routes/playbookRoutes');
const app = express();
const PORT = process.env.PORT || 3000;
app.use(bodyParser.json());
app.use('/api/v1/playbooks', playbookRoutes);
app.listen(PORT, () => {
 console.log(`Server running on http://localhost:${PORT}`);
});
3. Define Routes
Create a separate file - call it playbookRoutes.js to define API routes:
const express = require('express');
const router = express.Router();
const playbookController = require('../controllers/playbookController');
router.get('/', playbookController.getAllPlaybooks);
router.get('/:id', playbookController.getPlaybookById);
router.post('/', playbookController.createPlaybook);
router.put('/:id', playbookController.updatePlaybook);
router.delete('/:id', playbookController.deletePlaybook);
module.exports = router;
4. Define Controller Logic
The controller playbookController.js handles business logic, separating it from routing and server setup:
let playbooks = [
 {
   id: 1,
   department: 'Emergency',
   incidents: [
     { type: 'Code Blue', steps: ['Notify medical staff', 'Initiate CPR', 'Administer defibrillator'] },
     { type: 'Fire Drill', steps: ['Alert all staff', 'Evacuate patients', 'Secure critical equipment'] }
   ]
 },
 {
   id: 2,
   department: 'IT',
   incidents: [
     { type: 'Data Breach', steps: ['Isolate affected systems', 'Notify security team', 'Begin forensic analysis'] },
     { type: 'System Outage', steps: ['Diagnose root cause', 'Notify stakeholders', 'Implement temporary solution'] }
   ]
 },
 // Add more departments as needed
];
exports.getAllPlaybooks = (req, res) => {
 res.status(200).json(playbooks);
};
exports.getPlaybookById = (req, res) => {
 const playbook = playbooks.find(p => p.id === parseInt(req.params.id));
 if (playbook) {
   res.status(200).json(playbook);
 } else {
   res.status(404).json({ message: 'Playbook not found' });
 }
};
exports.createPlaybook = (req, res) => {
 const newPlaybook = {
   id: playbooks.length + 1,
   department: req.body.department,
   incidents: req.body.incidents
 };
 playbooks.push(newPlaybook);
 res.status(201).json(newPlaybook);
};
exports.updatePlaybook = (req, res) => {
 const playbook = playbooks.find(p => p.id === parseInt(req.params.id));
 if (playbook) {
   playbook.department = req.body.department || playbook.department;
   playbook.incidents = req.body.incidents || playbook.incidents;
   res.status(200).json(playbook);
 } else {
   res.status(404).json({ message: 'Playbook not found' });
 }
};
exports.deletePlaybook = (req, res) => {
 playbooks = playbooks.filter(p => p.id !== parseInt(req.params.id));
 res.status(204).send();
};
5. Run and Test API
Now let’s do a test - start the server using nodemon for real-time reloads:
npm run dev # or
npm start
Finally, let’s test this out on localhost with a quick curl command:
sz@dhcp101 incident-response-api % curl http://localhost:3000/api/v1/playbooks/1
{"id":1,"department":"Emergency","incidents":[{"type":"Code Blue","steps":["Notify medical staff","Initiate CPR","Administer defibrillator"]},{"type":"Fire Drill","steps":["Alert all staff","Evacuate patients","Secure critical equipment"]}]}%When to Use Mocking
API mocking is fundamental during the early stages of development when the backend services are not yet available or are unstable. By creating mock APIs, frontend and backend developers can work in parallel, reducing bottlenecks and improving response times. Mocking also allows you to test different scenarios, including error handling and edge cases, ensuring that the application behaves as expected under various conditions.
Setting Up a Mock API
Setting up a mock API can significantly accelerate the development cycle by allowing frontend and backend teams to work independently. While tools like Postman offer mock server capabilities, using Blackbird provides a more integrated and scalable solution. Blackbird's API Mocking feature enables rapid validation of business logic by creating sharable mocks with dynamic or static responses, all in just a few steps.
Blackbird simplifies the creation of mock APIs, ensuring that you can test application functionality without full backend implementation. This helps simulate API behavior and validate client interactions seamlessly.
Mocking with Blackbird
For this example, to mock away with Blackbird, I will use the OAS file for the API we created earlier for the Hospital Incident Response Playbook.
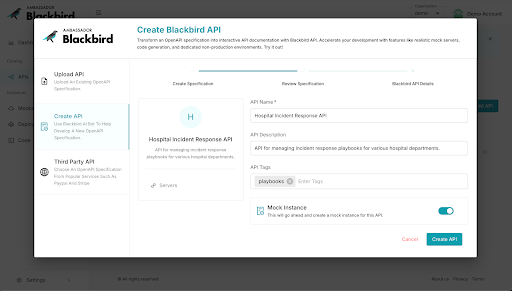
Begin by navigating to the Blackbird API creation page. You can either upload an existing OpenAPI specification (OAS) or use Blackbird’s AI-powered tools to create a new one. In this case, let’s create a new API specification.
Provide the API name, a brief description, and tags for easy categorization. Enable the “Mock Instance” toggle to immediately create a mock environment for this API after creation.

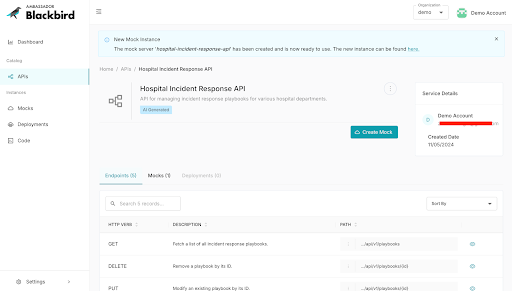
Once your API is created, it will appear in the APIs section of your Blackbird dashboard as you can see below.

Here, you can see details such as the number of endpoints, mock instances, and deployed instances for the Hospital Incident Response API.
To further configure or create additional mock instances, click on Create Mock or explore the mock details under Mocked Instances.
Testing and Using the Mock API
With the mock instance now live, you have a dedicated URL that can be shared with your team for testing and development.

Testing APIs with Mocking
Testing APIs using a mock server enables you to validate the application's interaction with the API, ensuring that it handles various responses correctly. Once the actual backend is available, you can switch from the mock endpoints to the real ones.
This transition should be seamless if the mock API accurately represents the real API's behavior. Regular testing with both mock and real APIs helps identify discrepancies and ensures that the application functions correctly in production.
Best Practices for API Development and Mocking
- Consistent Documentation: Maintain up-to-date API documentation to facilitate understanding and usage by other developers.
- Robust Error Handling: Implement comprehensive error handling to manage unexpected situations gracefully.
- Security Measures: Ensure that your API includes authentication and authorization mechanisms to protect sensitive data.
- Versioning: Use versioning to manage changes and maintain backward compatibility.
- Automated Testing: Incorporate automated tests to verify API functionality and detect issues early in the development cycle.
By following these best practices, you can do API design secure, reliable, and efficient APIs that meet the application's requirements and provide a seamless user experience.
In conclusion, mastering API creation and mocking is essential for modern software development. By designing well-structured APIs and utilizing mocking techniques, developers can accelerate development cycles, improve testing processes, and deliver high-quality applications.
Well-Intentioned API Creation Matters
A well-designed API supports scalable applications, and API mocking allows teams to work in parallel, reducing dependencies and speeding up development. By following this guide, developers can create intuitive, maintainable APIs with frameworks like Node.js and validate them early with tools like Blackbird, enhancing quality through thorough testing. Even better, once I mocked the API in Blackbird, I could do my testing in a production-like environment that’s hosted by Ambassador, saving me time, costs, and resources in my API creation journey.
Mocking with Blackbird streamlines collaboration between frontend and backend teams, while Open API specifications ensure consistent documentation and smooth transitions to production. Adopting these practices enables a more agile, efficient workflow, resulting in high-quality applications that meet user needs.

